


Your Shopping Cart
Loading...
Hot Items
Ski & Snowboard Outlets
How To Adjust Your Salomon Shift Ski Bindings
Posted April 30, 2021 @ 9:40am | by George Michaelsen
***Disclaimer*** It is best and we recommend having your skis adjusted and mounted by a professional technician at a ski shop. Your safety is important and comes first.
Whether it's the first storm of the year or your last chance to get some runs in late spring, getting off-piste is always a good time. The Salomon Shift has quickly become the most popular Alpine Touring binding by satisfying both needs when going up and coming down. Efficient uphill performance with the confidence of a traditional alpine binding for the down definitely provides a nice safety blanket most touring bindings do not have. The Shift is manufactured by Amer Sports and is offered in three models. Regardless if it's Atomic Shift, Salomon Shift, or Armada Shift you are going to follow the same steps when making adjustments. Whether you're testing your homey's new skis or just want to see what the Shift is all about, make sure you got those bindings dialed before you start sending.
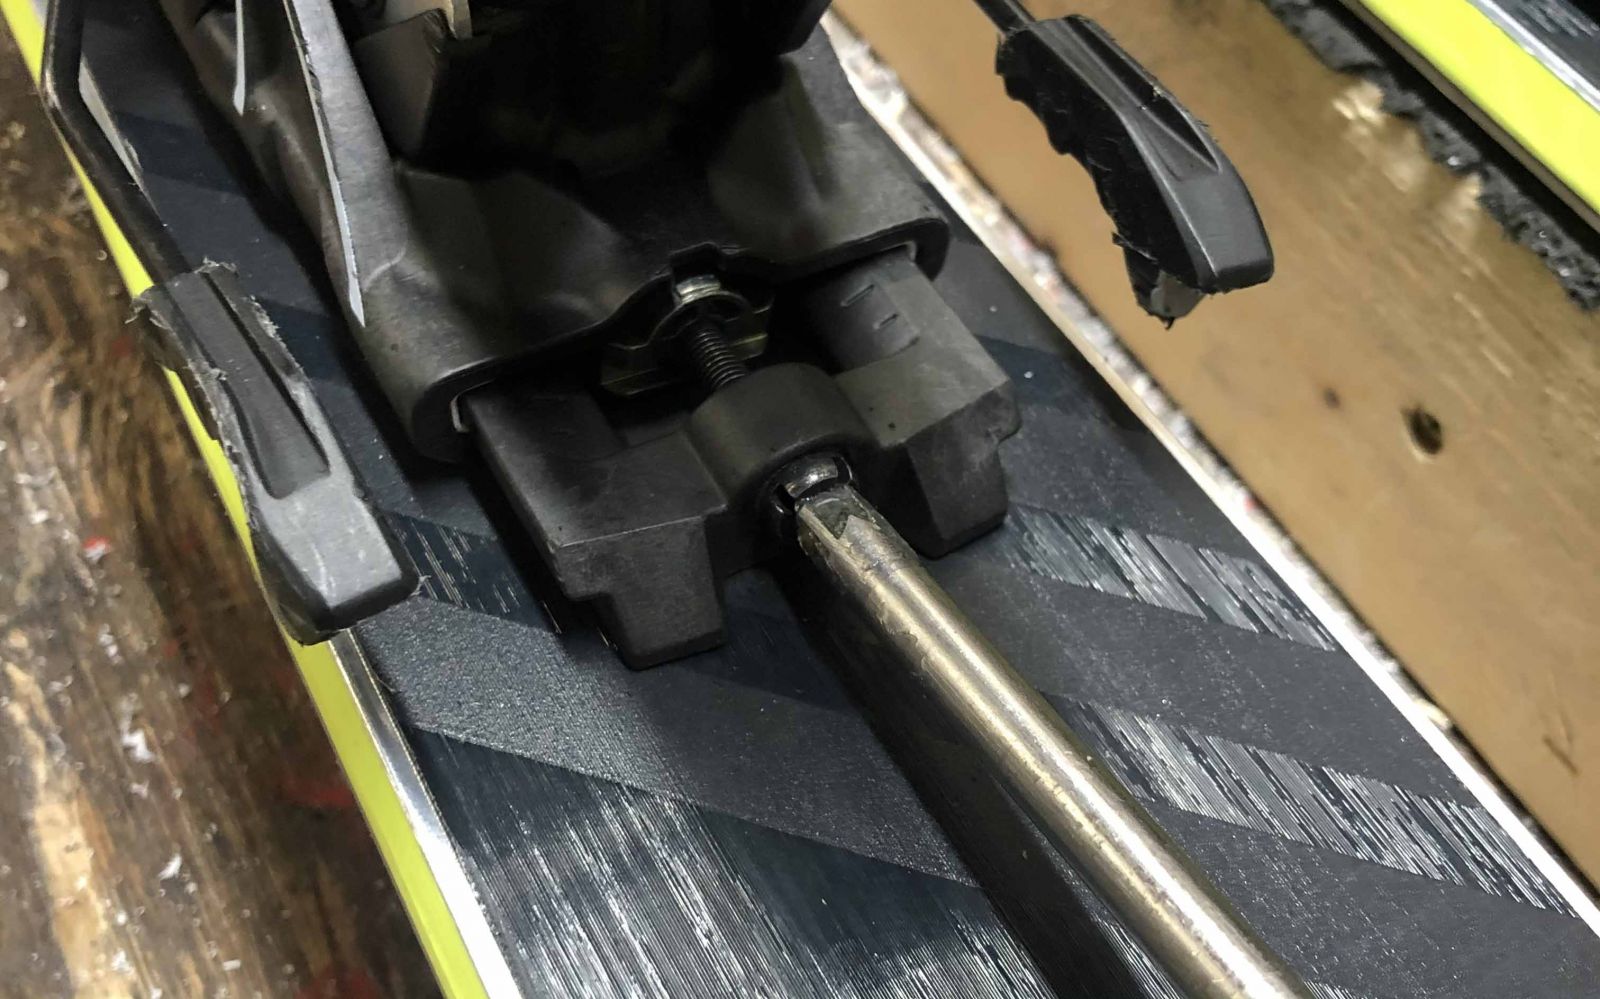
Let's get started with the most important piece to the puzzle when it comes to binding adjustments...forward pressure. Almost every ski binding is going to have a forward pressure indicator on the heel piece. You can find this indicator on the back of the heel piece that's almost flush with the binding base plate. The Salomon Shift makes it super easy to identify and just as easy to adjust. Image below points out where to find it and what it looks like. Only thing you're going to need to get this party started is a Phillips head screwdriver and you are ready to rock. Remember this is the MOST important adjustment you will be making so pay attention..jpeg)
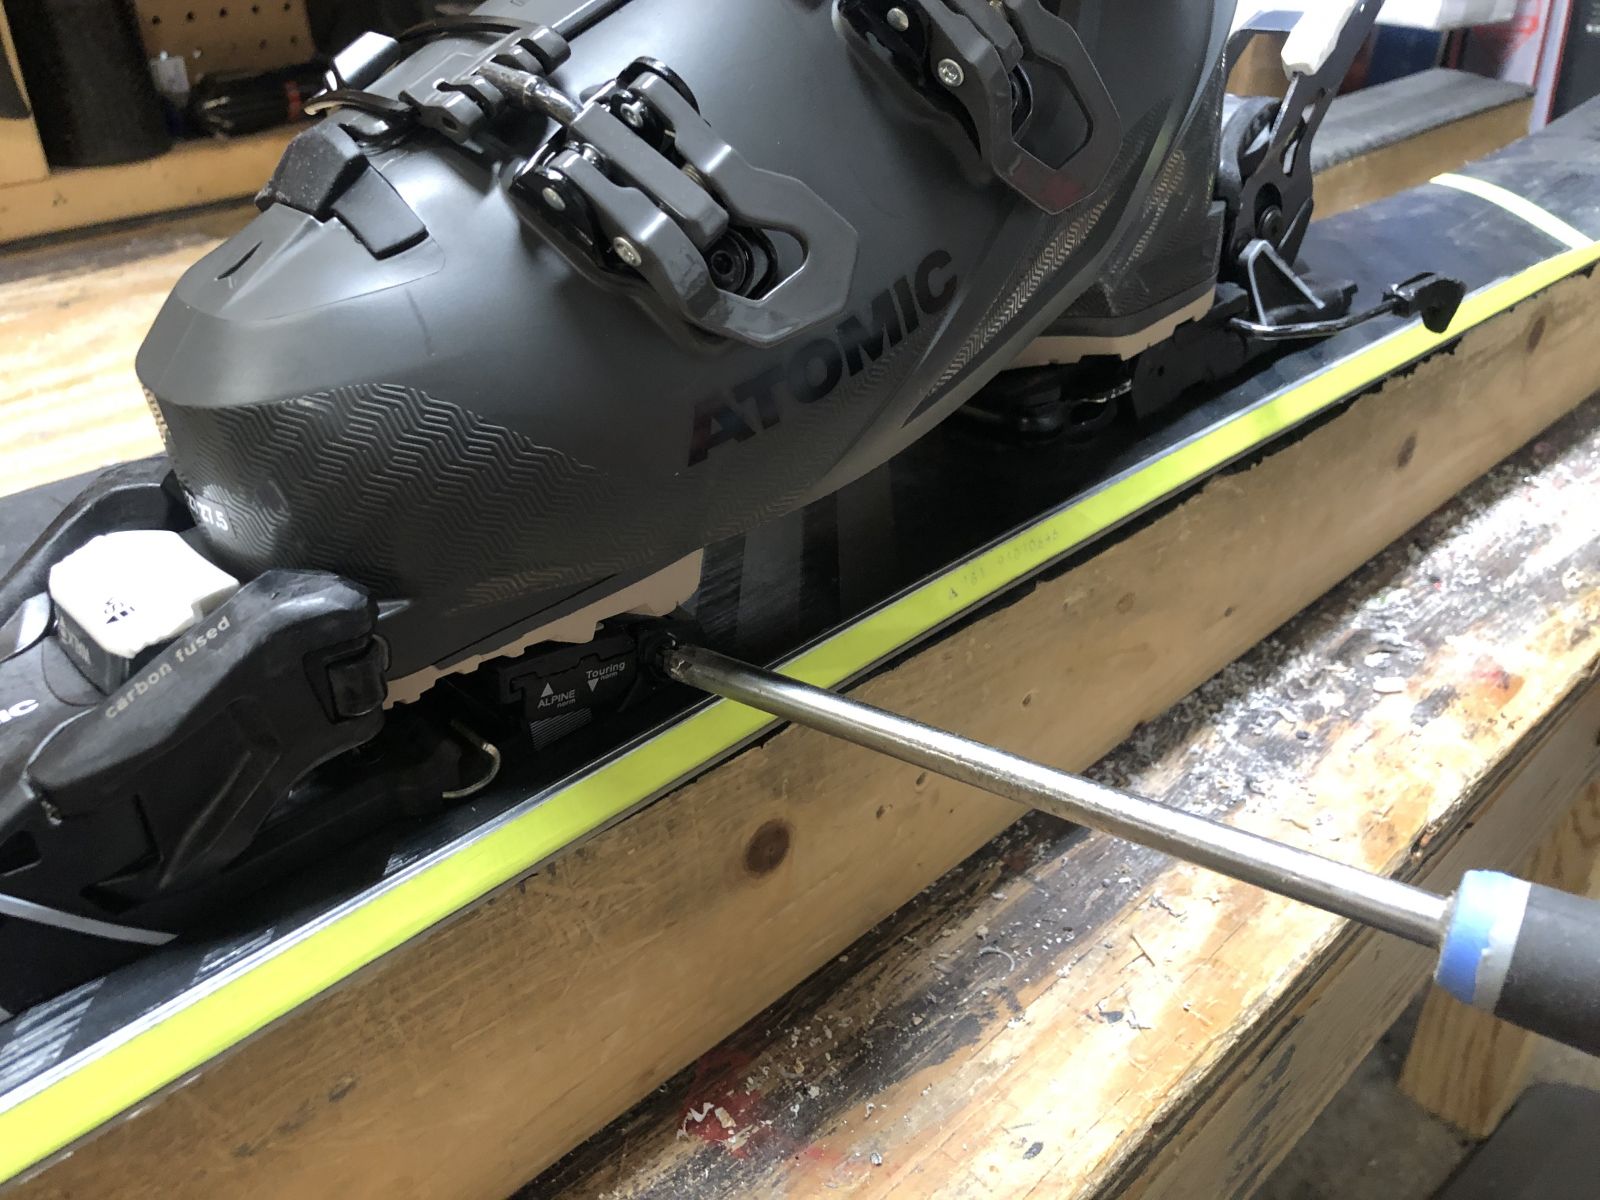
The following steps are going to guide you through the process from start to finish, so smash a Red Bull or espresso and let that caffeine get your mind right. First you want to engage the boot into the binding. If the boot doesn't engage into the heel piece, the binding is either too tight or too loose. If the heel of your boot is hitting the heel piece and cannot be physically engaged, you will need to move the heel piece backwards. You move the binding backwards by inserting the screwdriver into the forward pressure adjuster. This adjustment screw is located at the backside of the heel piece and is flush with the ski. To move the heel piece backwards you will need to make counter-clockwise rotations, to move the heel piece forward you make clockwise rotations. To recap, if the boot cannot be engaged cause it's too tight, simply move the heel piece backwards (counter-clockwise). If it's too loose move the heel piece forwards (clockwise). If the boot doesn't engage at all then you're going to need to remount the bindings, that is something you should definitely not do and bring to your local shop.
Once you get heel piece in a position where it can be engaged we want to return the the forward pressure indicator on the base of the binding in the back. You will see a small bump up on the top of the adjustment screw. We want that bump to land in the center of the window that can be seen from above.
If the bump is sitting too far back and not within the window (Left Image), forward pressure is too loose and you will need to move the heel piece forward by turning the screw (clockwise.) If the bump is hidden within the binding (Right Image), the forward pressure is too tight and you will need to move the binding backwards by turning the screw (counter-clockwise).
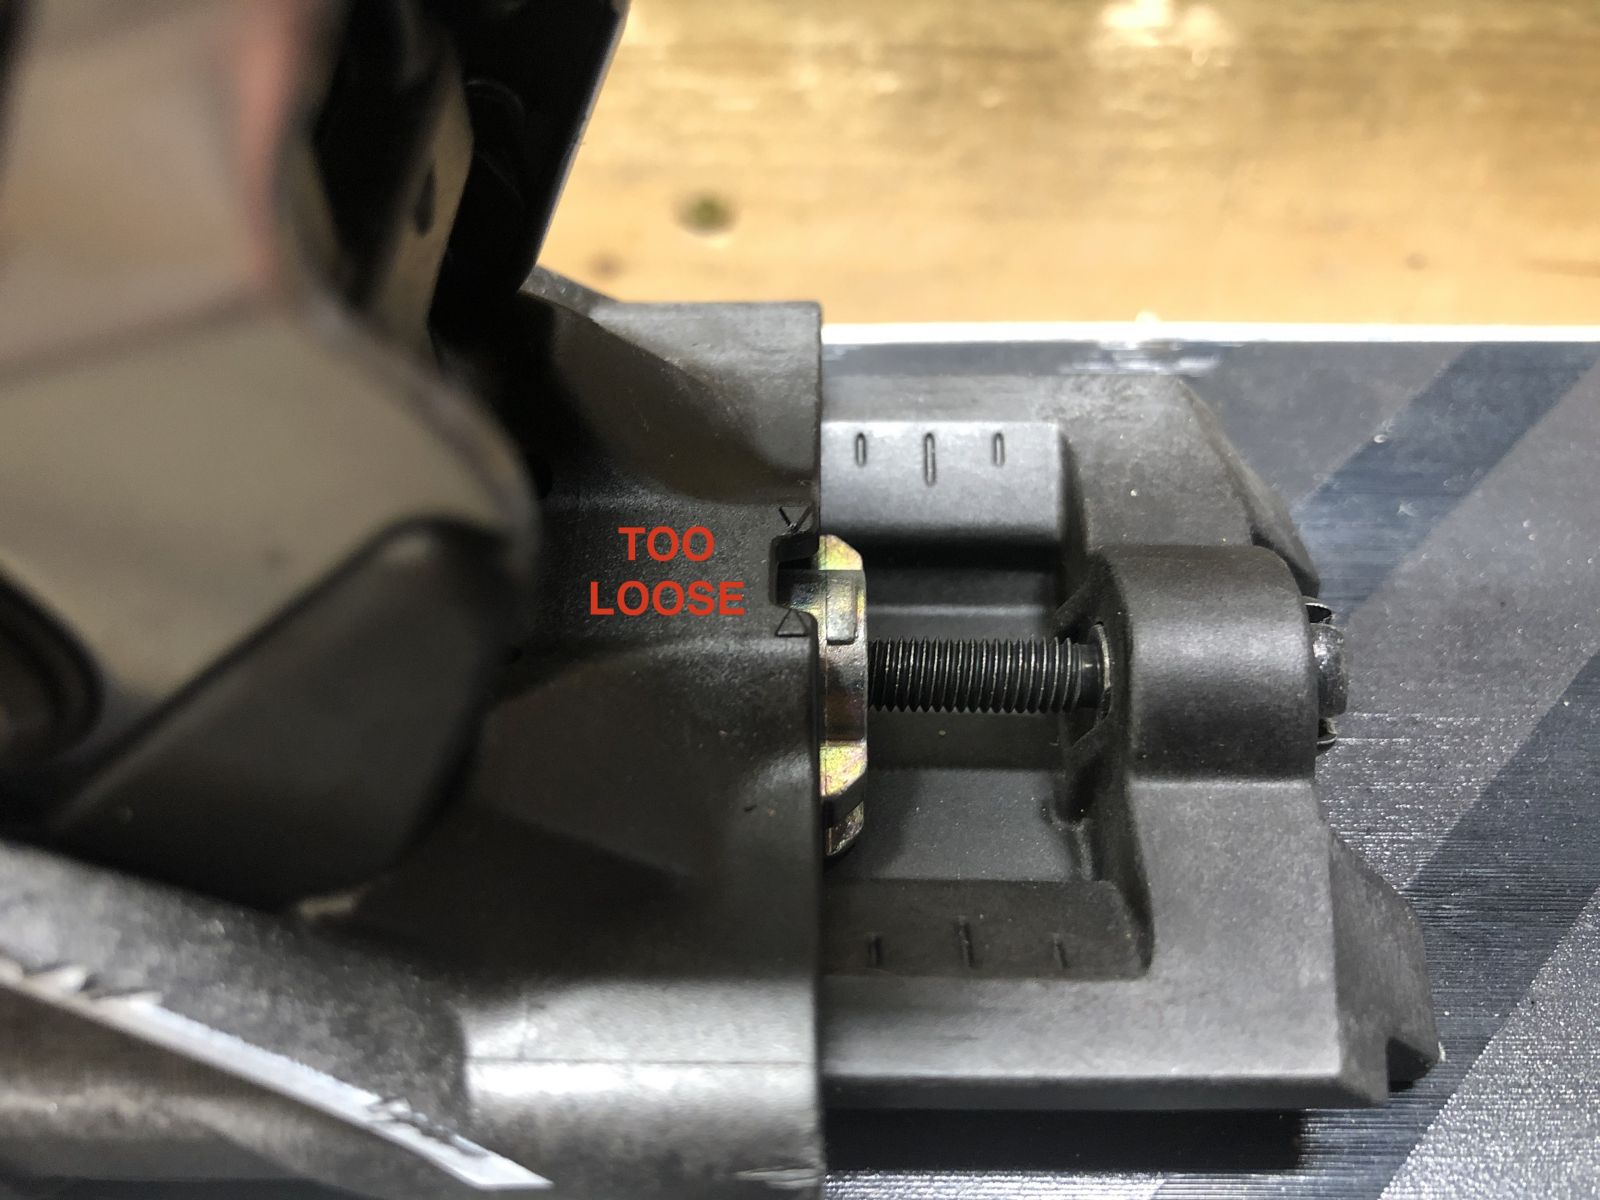
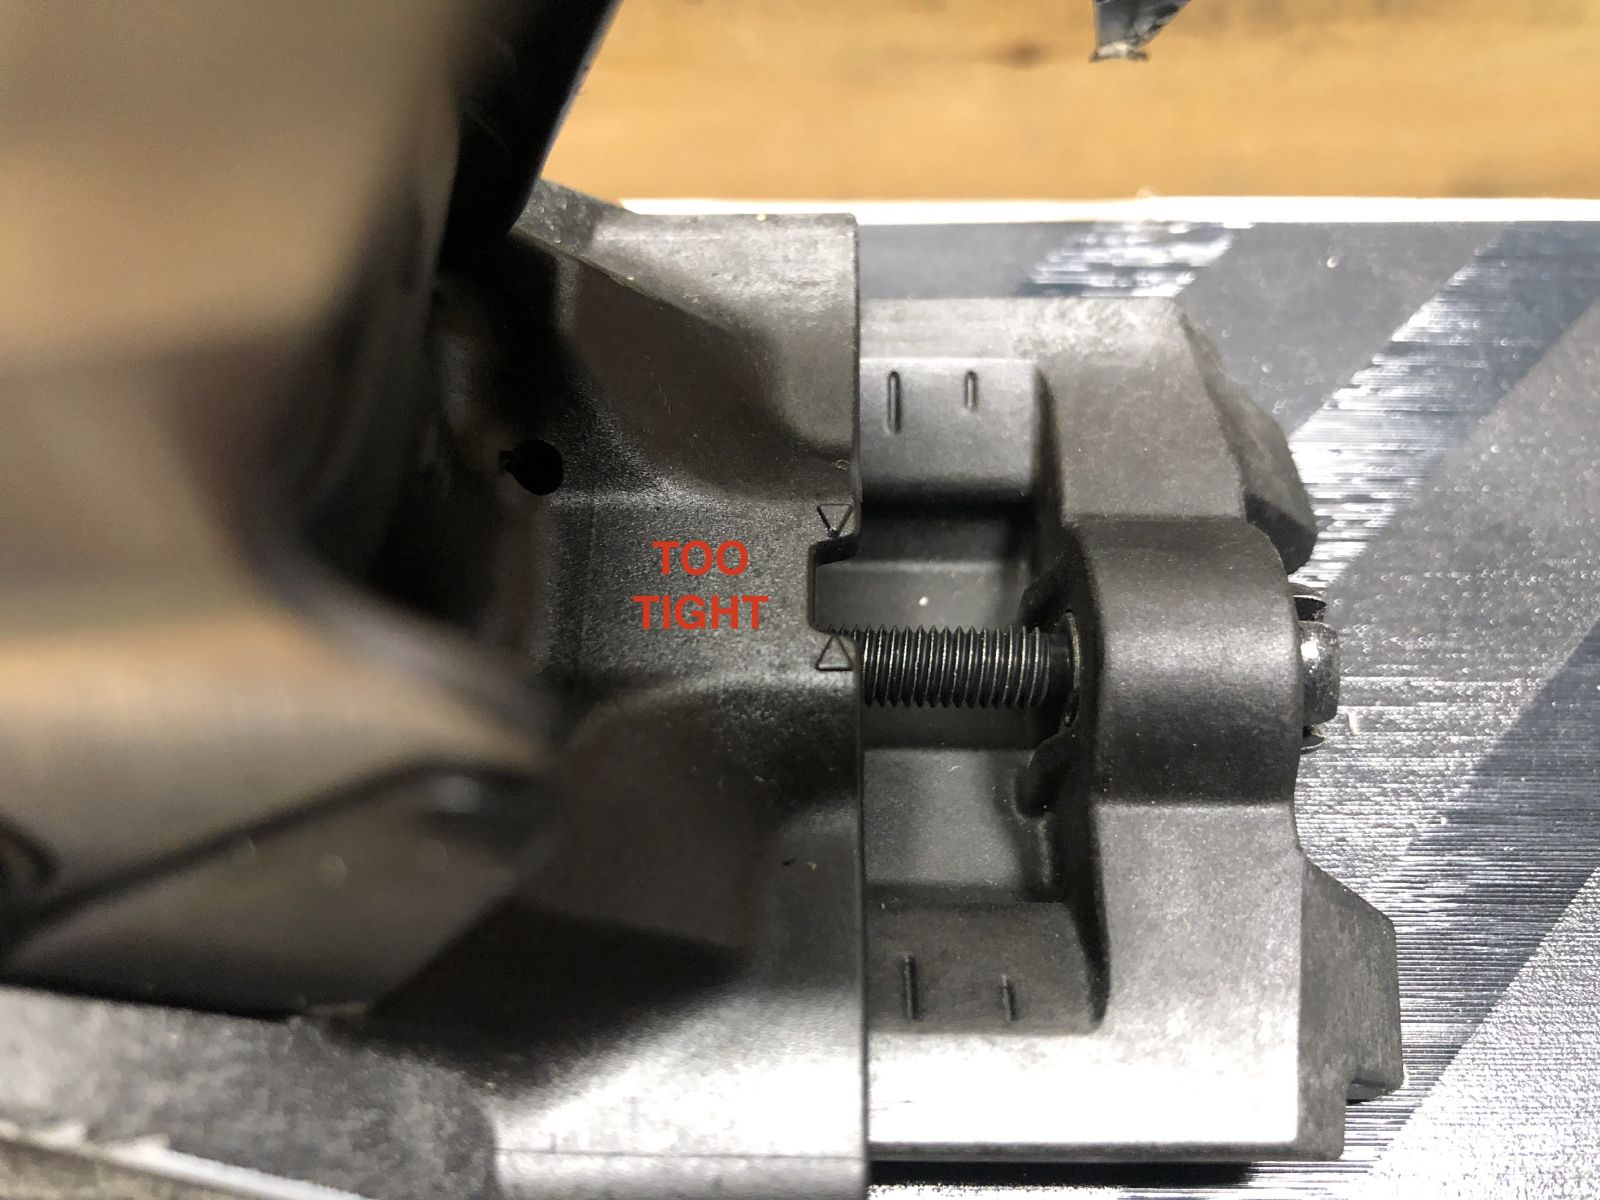
Once the proper adjustments are made you will notice the bump up indicator is sitting in the center of the small window (SEE BELOW). If you think you have the proper forward pressure, remove the boot and reengage the boot several times to make sure you have made the proper adjustments. It's super important you have done this correctly. Remember you are going to shredding, take the time to get it right. If you are unsure please let a local professional make the adjustment.
.jpeg)
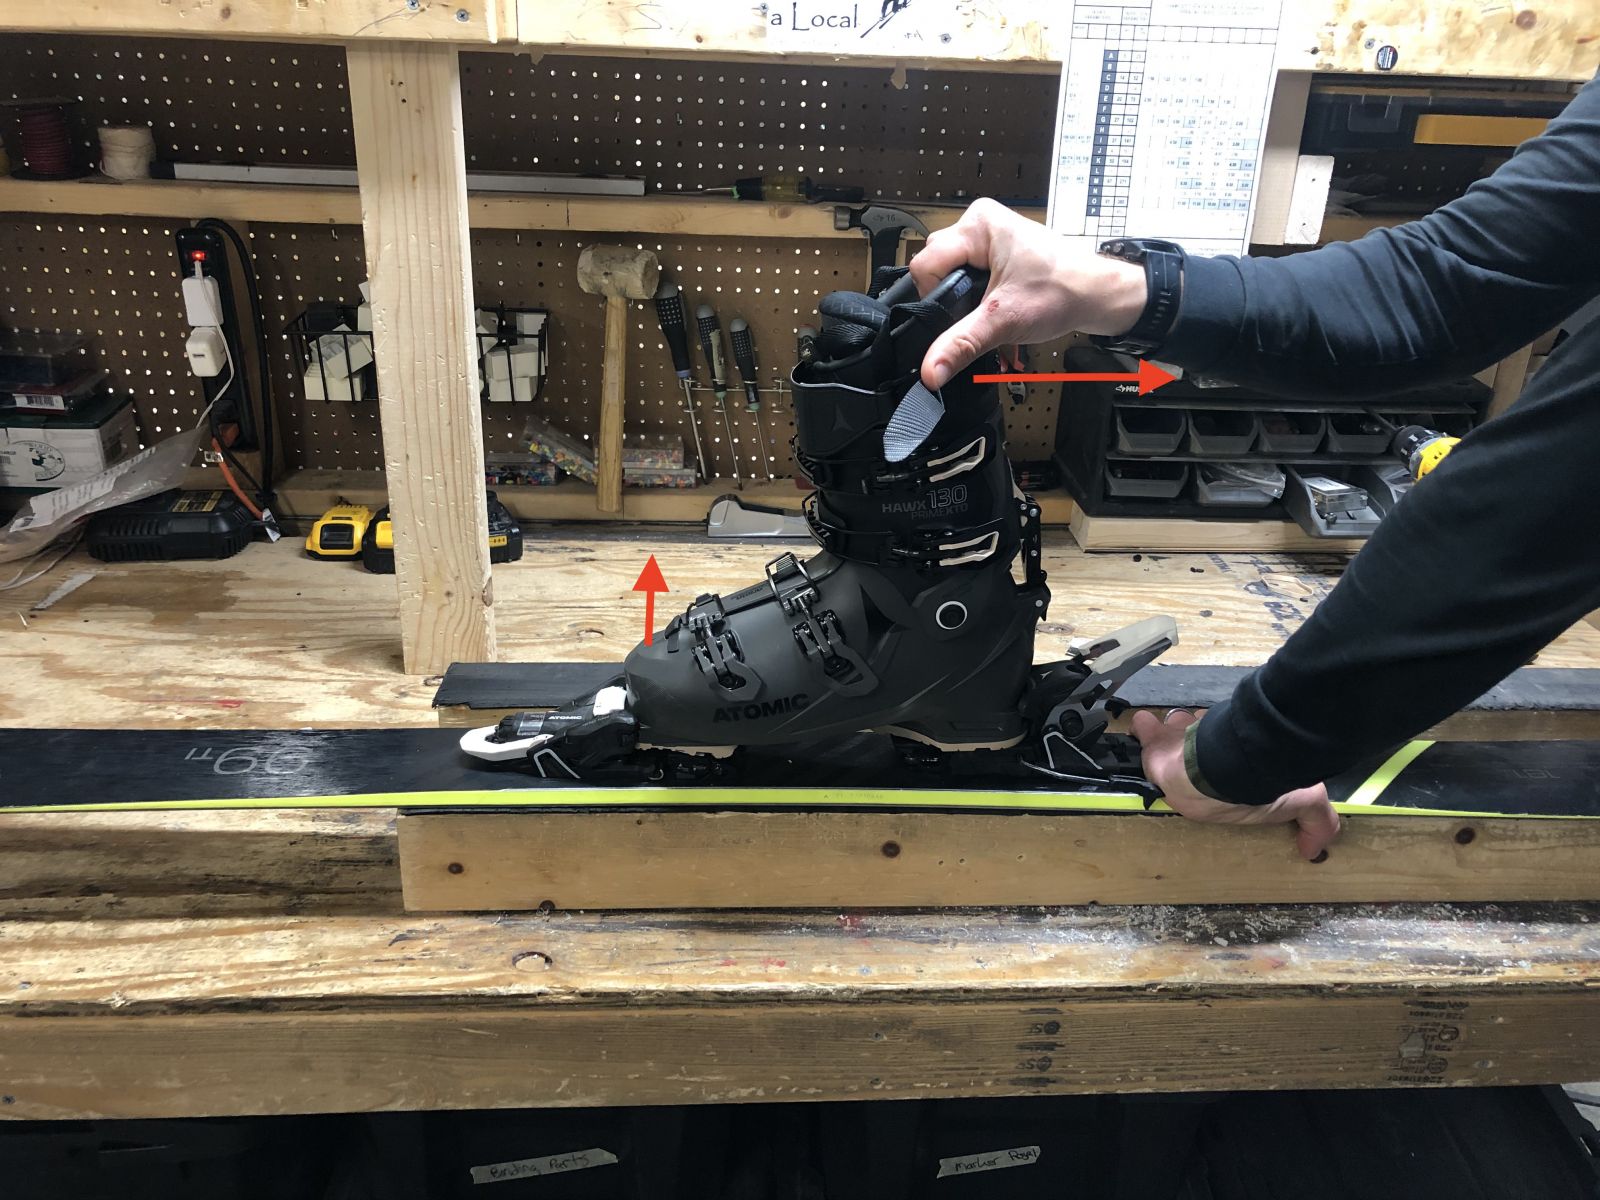
When the forward pressure is dialed in its time to move onto the AFD (Anti-Firction Device). This is another important step that is often done incorrectly. Start by engaging the boot into the binding. After it is engaged it is IMPERATIVE you tug the back of the boot backwards in an effort to lift the toe of the boot up into the correct position. If this is not done the toe of your boot will be sitting too low and will indicate your forward pressure is correct. IT IS NOT! You have to pull or push the boot backwards to lift the toe. Only after you get the boot in the correct position will you make any adjustments to the AFD.
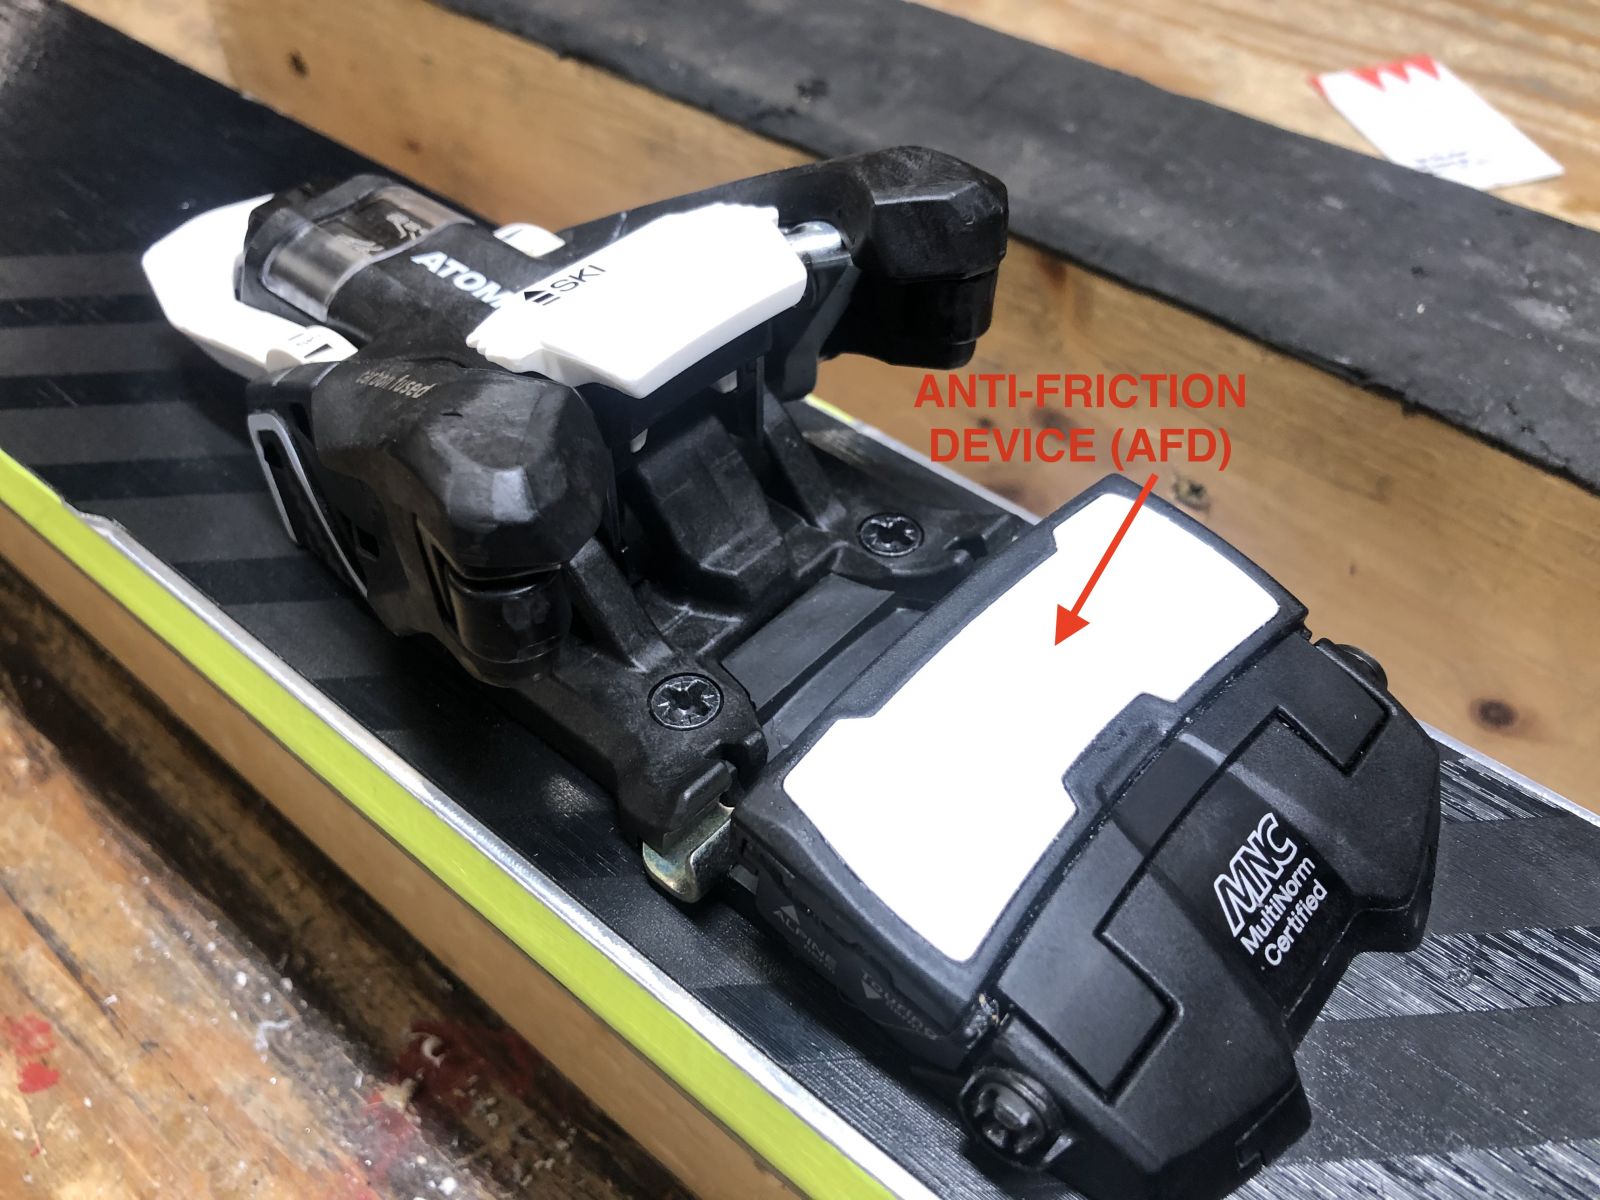
You will need a Phillips head screwdriver to make adjustments to the AFD. Turning the AFD screw clockwise will cause the the AFD to rise, counter clockwise will lower the AFD.
.jpeg)
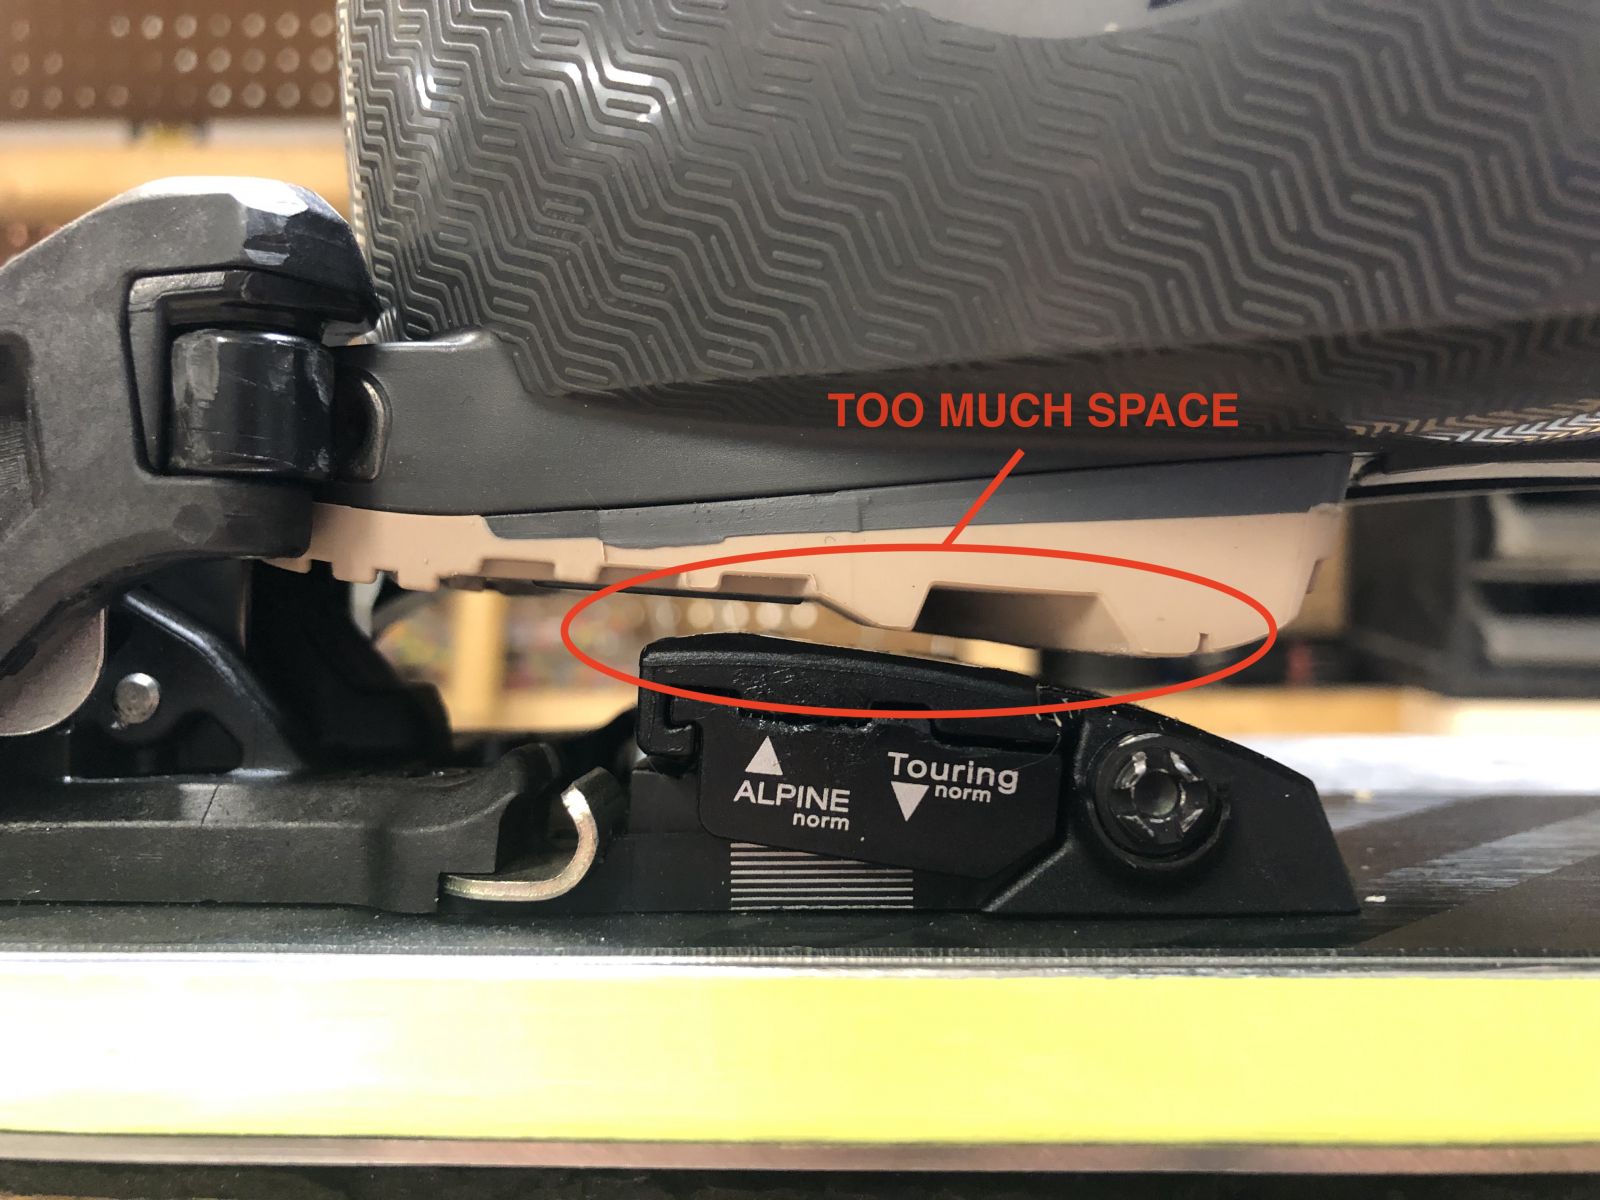
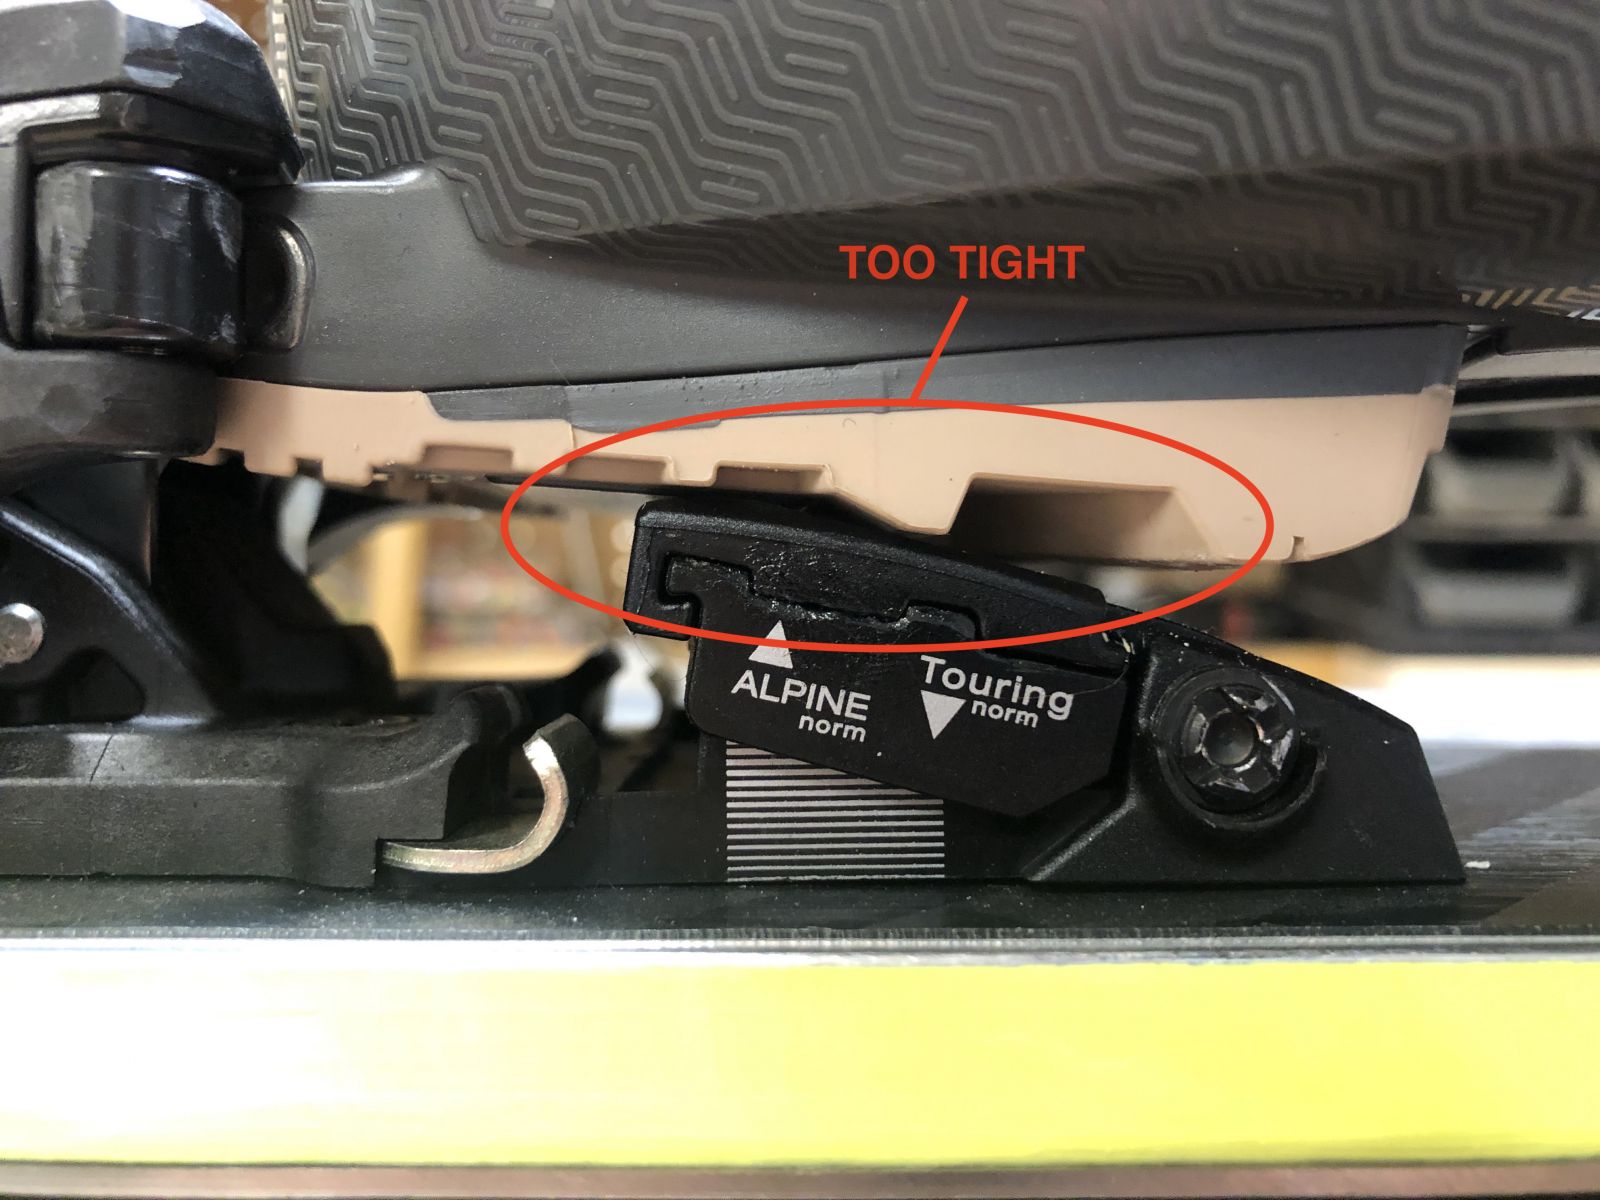
Now we have to find the proper amount of friction between the sole of the boot and the AFD. Engage the boot into the binding, tug the boot back to life the toe, and take a look at the amount of space between the AFD and boot sole. Keep in mind there may be no gap between the two. If there is a visible gap between the AFD and the bottom of the boot we need to raise the height of the AFD (Left Image). If there is a lot of contact we need to lower the AFD (Right Image).
Once you got the boot and AFD making minor contact you will need to grab a business card or something similar. A credit card is too thick and a piece of paper is too thin for reference. Now insert the card between the AFD and the boot sole. When inserted you want the card to move back and forth with resistance. If the card folds over, the pressure is too tight. If the card slides in and out with minimal or no friction it is too loose. Make small adjustments until you feel you have found that sweet spot. Again, you want resistance, but if the card or whatever you chose folds over then it's too tight.

When you think you have got the correct amount of contact you need to release the boot from the binding and reengage the boot. Repeat the process a couple of times by reengaging the boot, tugging the boot backwards, and checking the AFD pressure with the card. When the friction is consistent you have successfully dialed in your AFD!
Remember to be patient and make sure you are paying attention to all the adjustments. If at any point you are unsure, please bring the boot and your setup to a local shop.
The one thing that I want you to take away from this blog is knowing what it means to have your forward pressure and your AFD set properly. When skiers pre-release out of there bindings forward pressure or AFD being set incorrectly is often the culprit. If it is set properly the DIN's are most likely too low. AND sometimes... sometimes... it's extremely rare, but you could have a lemon of a ski binding.
The Salomon Shift is compatible with ISO 5355, ISO 9253, Gripwalk, WTR, and MNC. If you don't know what your boot has, the Alpine Touring Ski Boot Comparison blog could help you find the answers.
Filed Under: Ski Bindings
| Permalink