


Your Shopping Cart
Loading...
Hot Items
Ski & Snowboard Outlets
How To Adjust Your Dynafit Ski Bindings
Posted October 14, 2016 @ 4:24pm | by Brady Page
***Disclaimer*** It is best and we recommend having your skis adjusted and mounted by a professional technician at a ski shop. Your safety is important and comes first.
Since opening our shop in Boston a couple years ago, I have seen hundreds of tech bindings come through our ski shop for tech work, mounting etc. It is quite shocking how many of these are set up incorrectly. The most common problem is that the forward pressure is often way too tight or too loose. People love to mess around with their own gear, but personal safety can become an issue. This is the exact reason for writing this blog on how to adjust Dynafit Bindings. For those who cannot resist the urge, this blog will help you adjust your gear with a more knowledgable approach. Tinkering with these bindings without completely understanding what you are doing could end disastrously -- we don't want that. I always suggest bringing them to a local shop for proper adjustment, but if you wondering if your Dynafit bindings are set up incorrectly this blog will help. (All standard mounts including Dynafit bindings are only $40 at our store by the way)
Dynafit tech bindings have been around for 30 years. They have been developing, tweaking, engineering improvements year in and out to maximize your backcountry experience. This blog is intended to help you understand how your binding works and how to properly adjust your forward pressure if you feel if it is too tight or too loose.
Historically the “Heel Gap” was a part of all Dynafit bindings. Each binding requires specific amount of distance that the heel of the boot and binding should have in between one another. Since there is a specific amount of space between the different types of bindings makes it difficult. At the end of the day 5mm is acceptable distance for any Dynafit binding that requires the “Heel Gap”.
Why Is It Important?
The spacing is SUPER important for a couple reasons. The first is positioning the binding pins in the correct location within the heel of the boot. If the pins are too deep within the boot the forward pressure will be too high causing you NOT to release when you should. When the pins are not in enough you could pre-release at any moment.
Secondly, the reason for the heel gap is to allow the ski to perform properly. For example when you are on the descent and you want to lay over a nice arcing carve, the pins need to be able to move in and out to allow the ski to flex properly. Again, if they are to deep it will prevent your ski from proper flex naturally resulting in poor performance. If it is too loose when you exit the turn your ski could have a slight reverse flex causing the pins to disengage.
Now that we understand the importance, lets talk about the “Heel Gap”. Within the original box of your binding packaging is a small plastic piece that is included. That piece is the tool we will use to make our specified heel gap. There is a few types of these plastic pieces that vary in millimeter width. Below is a breakdown of what measurement required for each Dynafit binding.
Heel Gap Measurement Spacing
A lof of posts and blogs make this seem way too complicated it's not. All Dynafit Bindings require some gap spacing, it just depends on the model.
The first list is all the Dynafit Bindings that require a “Heel Gap” of 5mm:
- Low Tech Race 1 & 2
- Superlite 1 & 2
- Speed Turn 1 & 2
- Speed Radical
- Radical ST/FT
- Vertical ST/FT
The second list is all the Dynafit Bindings that require a “Sliver Space” of 0.2mm:
- Radical 2.0 ST
- Radcial 2.0 FT
- Beast 14
- Beast 16
- Rotation 10
- Rotation 12
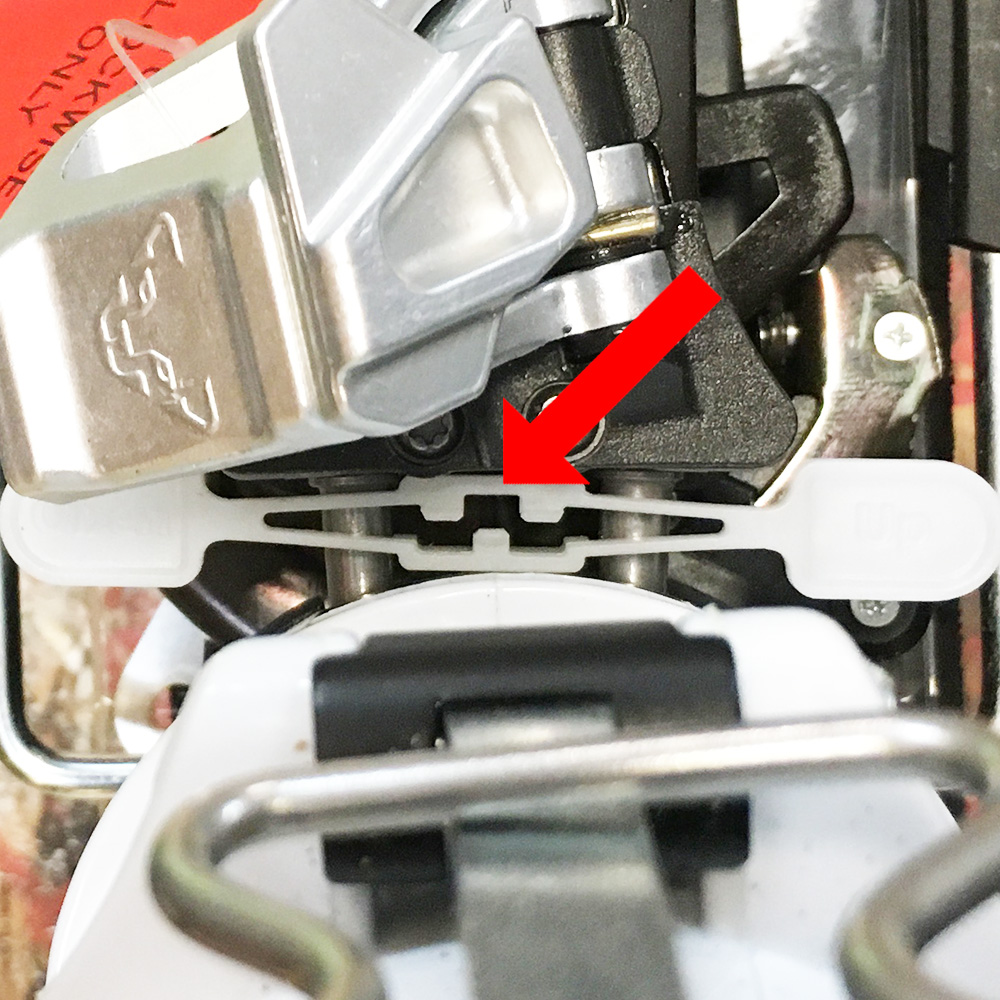
Finding The Forward Pressure For 5mm Heel Gap
Begin by engaging the boot into the toe pins. Once your toe is pinned in, lower the boot to your heel piece and engage the heel pins. At this point you will be able to see if you are close or way off. If you have no space between the heel of the boot and the binding then your forward pressure is too tight. If the pins are barely entering the back of the boot then you forward pressure is to low. The following images will go over what both of these scenarios look like.
Now we are going to use the plastic spacer that I mentioned earlier (see the image below) to find the correct amount of spacing. If you do not have this piece, a great alternative is #5 metric hex key. This will provide you with the 5mm gap needed for proper forward pressure. Substitute the hex key for the plastic spacer in the following paragraphs, if you do not have your orignal Dynafit spacer.
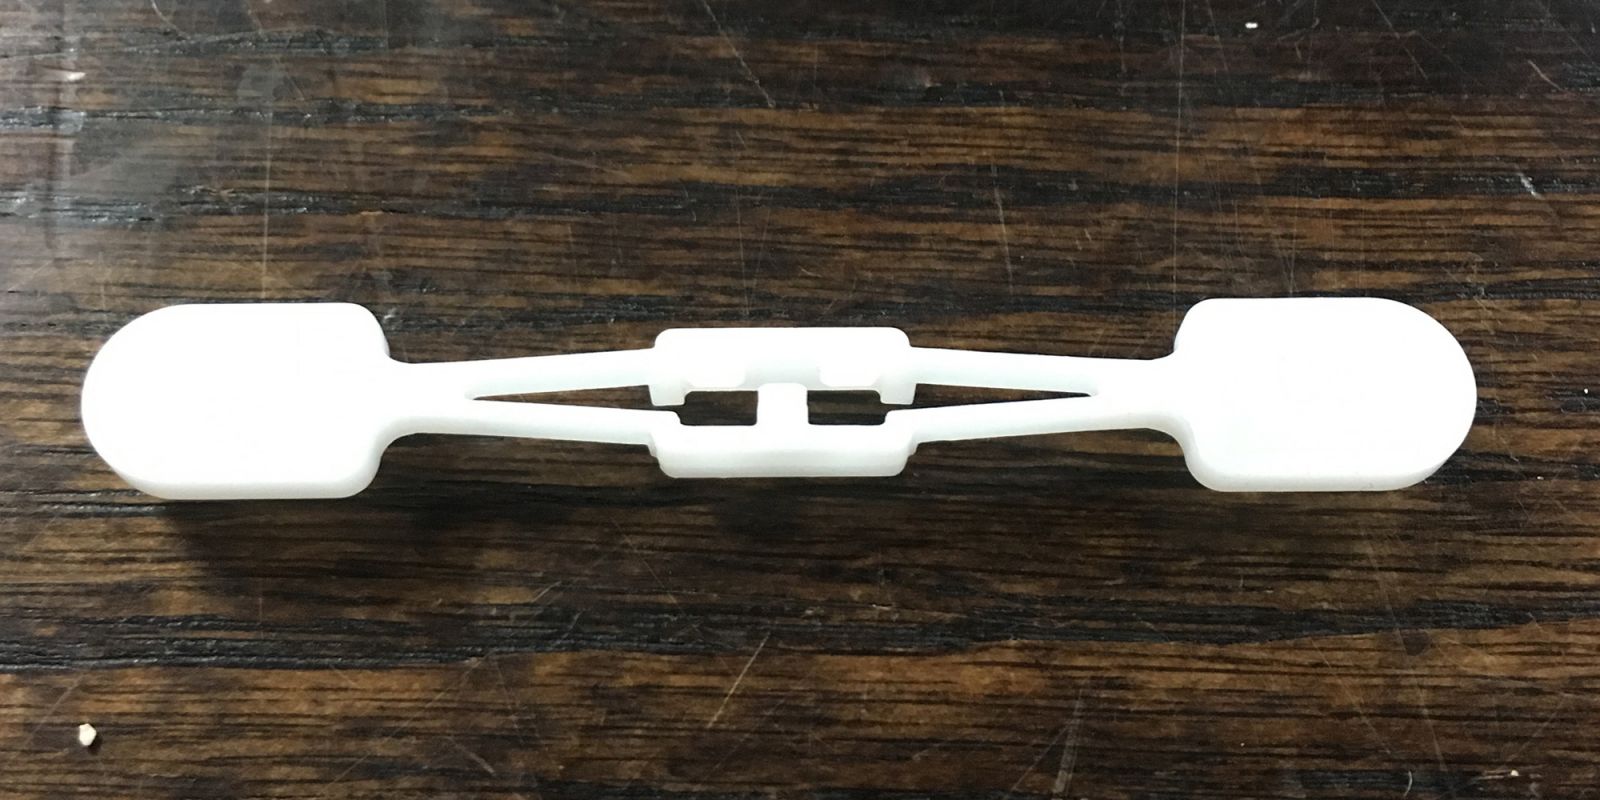
Re-engage the the boot back into the binding and turn the screw (found on the back of the baseplate on the binding) clockwise to make it looser in order to open up space, or turn it counter clockwise to reduce the space between the binding and boot -- yes it's backwards from Righty Tighty, Lefty Loosey. You are going to need to open up enough space to allow the plastic spacer to sit on the pins without being squeezed.
.jpg)
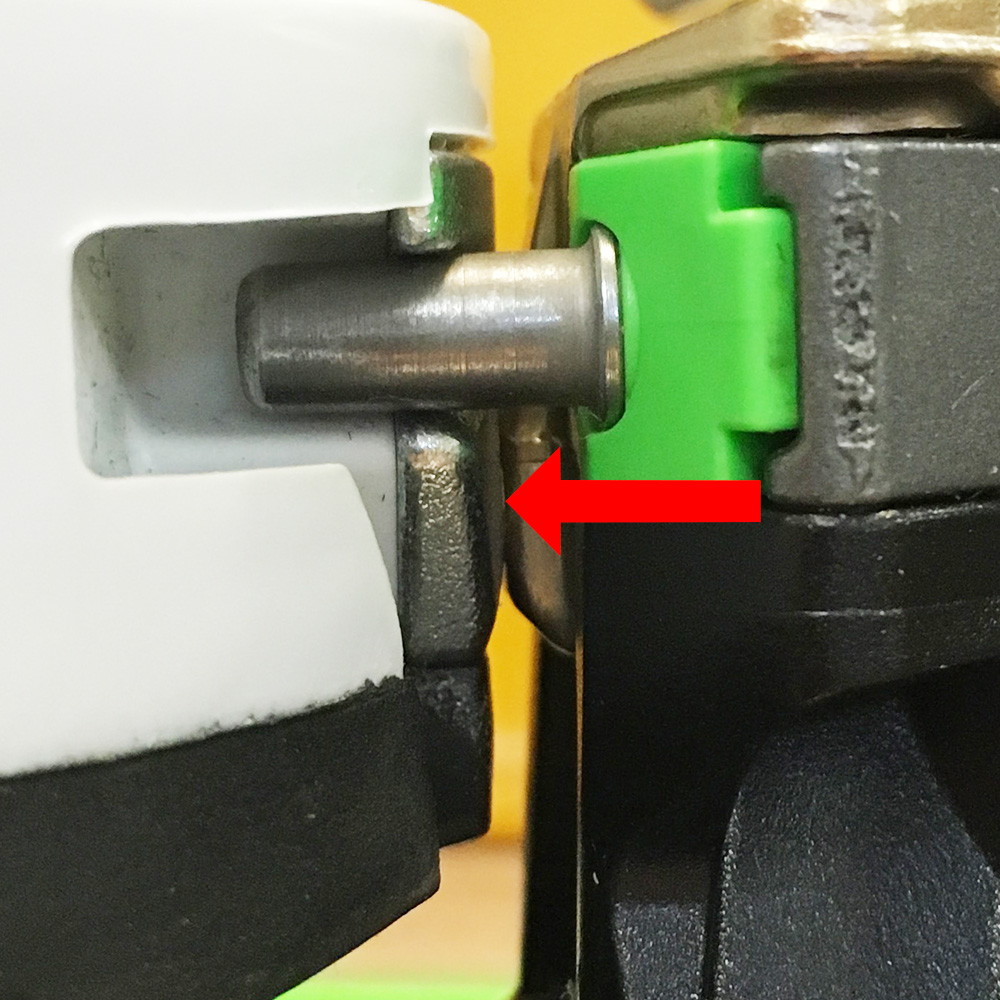
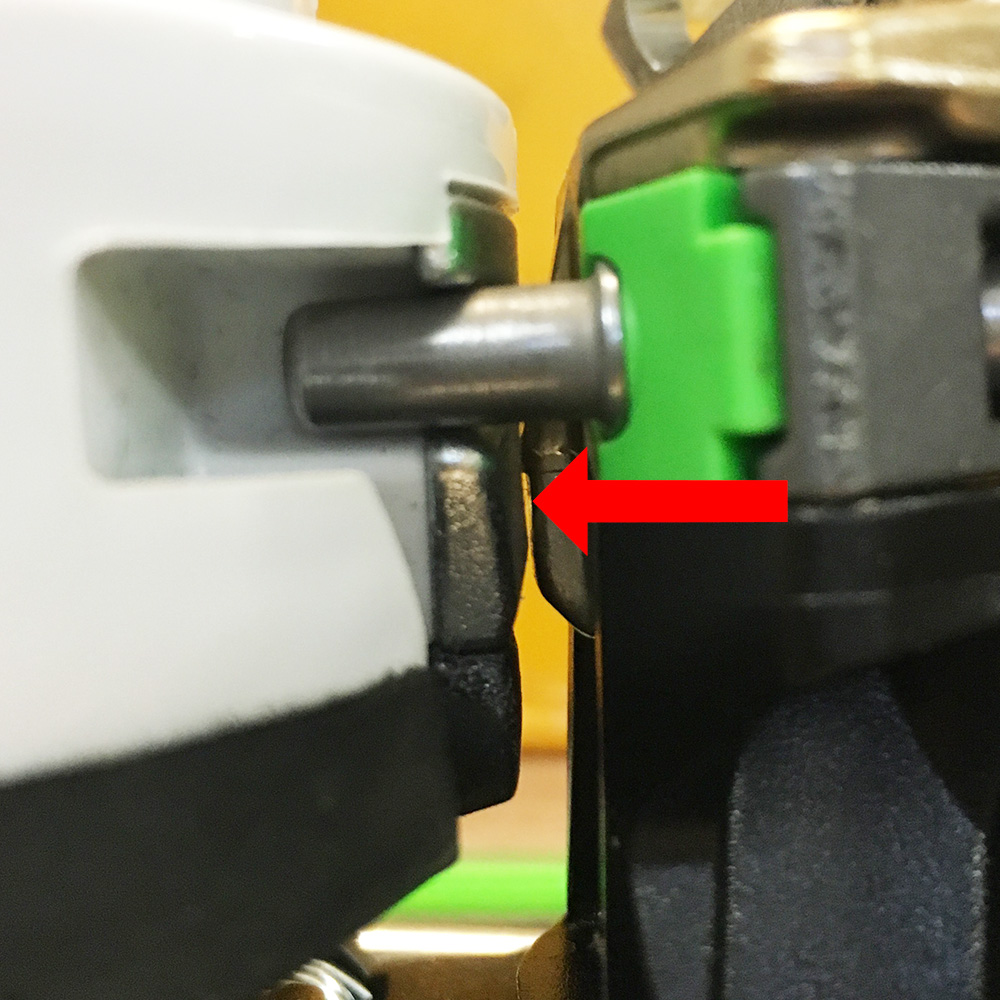
With the spacer resting on the binding pins you are going to turn the screw counter clockwise and begin closing the gap. Eventually the plastic spacer will begin to make contact with both the boot and binding. What we are looking for is the plastic clip to close in enough so that we create a straight line through the center of the white spacer.
The following images from left to right show you forward pressure that is too tight, perfect, and too loose.
.jpg)
Once you think you have found the sweet spot, disengage and re-engage the boot a few times to triple check that forward pressure stays correct.
Finding The Forward Pressure For 0.2mm Heel Gap
The Radical 2.0 ST, Radical 2.0 FT, Beast 14, and Beast 16 need much less space.
Pin the toe into the binding and then engage the boot into the heel piece. You will notice that when you push the boot in the heel piece slides back then bounces back forward.
We are looking for a significantly smaller gap this time and no additional spacers will be needed for this process. The forward pressure we are looking for is literally a paper thin gap between the heel piece and the binding. If you cannot see a little light coming through, then it is too tight. If there is a wide open gap then it is too loose. The follwing images from left to right will indicate too tight, perfect forward pressure, and too loose.

Follow the same steps by turning the screw found on the back of the binding on the base plate clockwise to create more space and counter clockwise to reduce space (again this is backward from Righty Tighty - Lefty Loosey). A trick that can be used is to tighten the binding to the boot with a piece of paper in between the two. Make it just tight enough so the small piece of paper will be held up by the pressure being created between the binding and boot. Now slowly turn the adjustment screw on the back clockwise until the paper falls free. This will give you nearly perfect forward pressure. The following images will show you all scenarios so you know you have the forward pressure just right.
Again, re-engage the boot a few times to make sure everything is seated properly and forward pressure is correct.
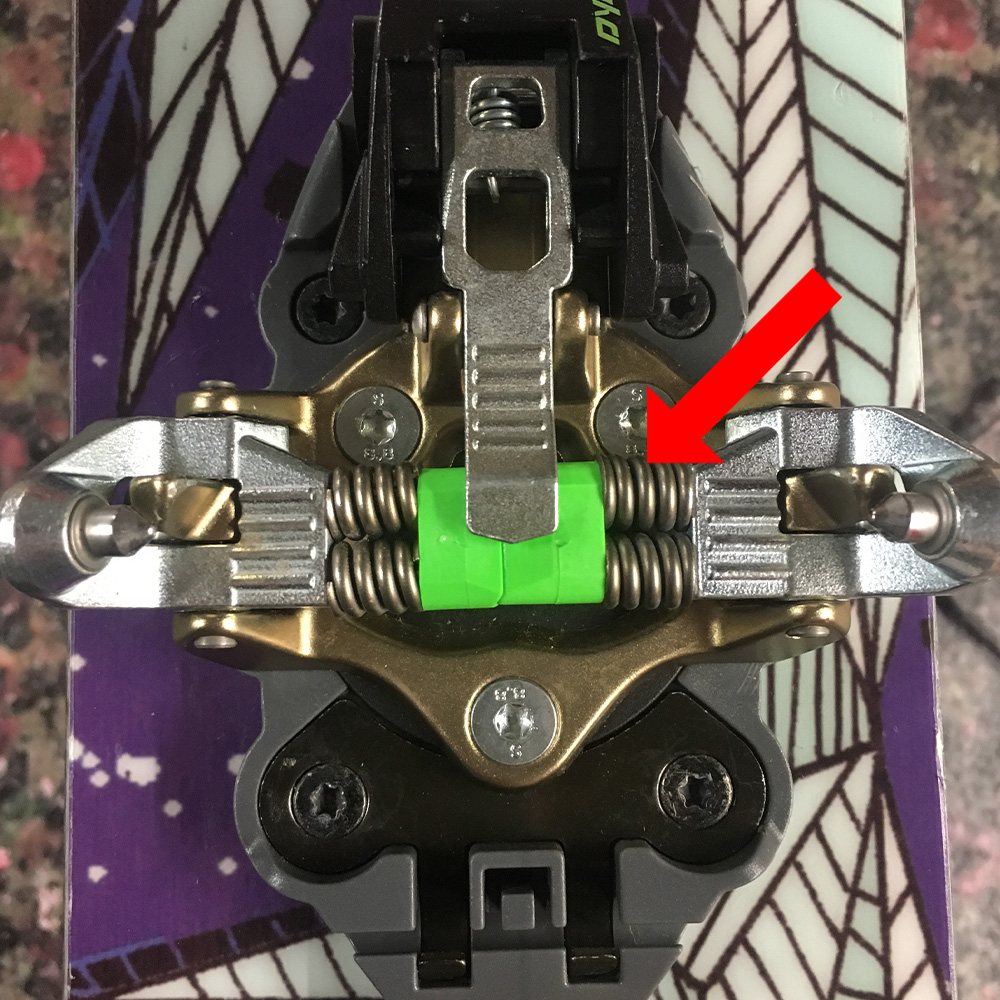
Setting the DIN (Release Setting)
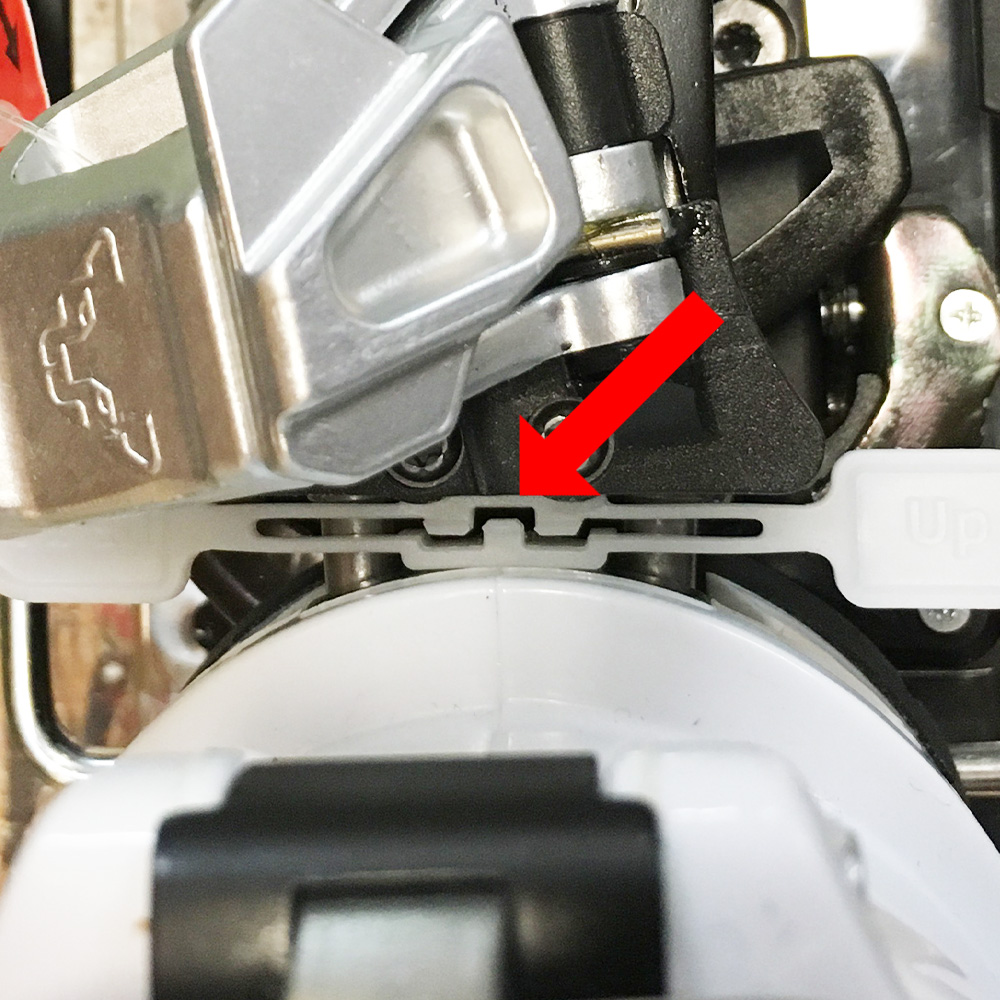
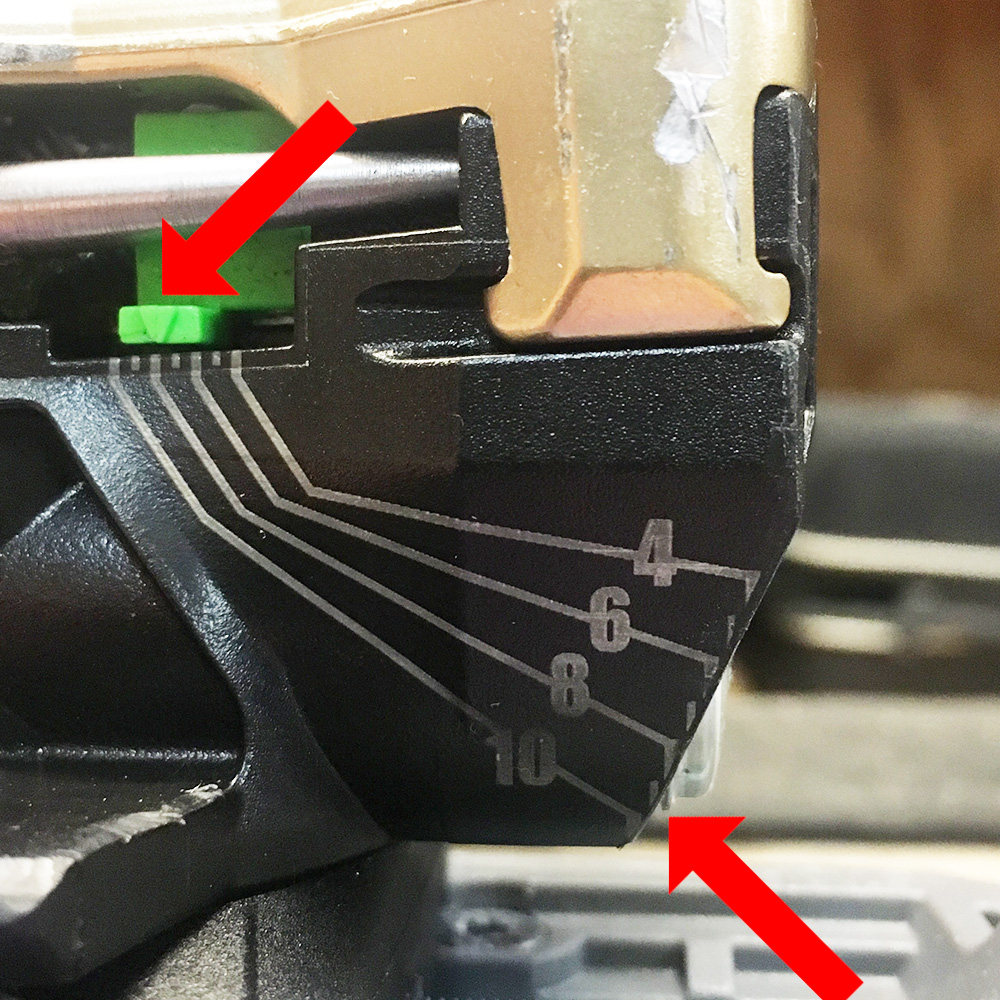
The last part of any binding adjustment is setting the DIN/your release setting. Dynafit DIN settings are done slightly different that standard alpine bindings. The toe piece of all Dynafit bindings has no adjustable DIN, but the four springs located within the toe rests around a 4 DIN. The heel piece contains two DIN settings. One of the settings is for forward pressure (Right Image - Arrow bottom right pointing at a very difficult to see vertical line on the metal button <- that's the DIN indicator, it's set to an 8 DIN) and the second is for lateral pressure (Right Image - Arrow pointing at the green DIN Indicator at an 8 DIN). Both of these are equally as important when making adjustments to the binding and the DIN numbers should always match. The higher the DIN the harder it becomes to release from your binding.
Now you may be asking 'How do I know what my DIN is supposed to be?'. If you find yourself asking that question, go take your skis to a shop and have them get your bindings dialed in for you. Once you know what your DIN is supposed to be for a certain binding (It does differ a bit from brand to brand) you'll know what to set your bindings at for next time.
The one thing that I want you to take away from this blog is knowing what it means to have your forward pressure set properly. When skiers pre-release out of there bindings or don't release at all, an incorrect forward pressure is often the culprit. If the forward happens to be set properly, then the DIN's (release settings) are most likely either too high or low... AND sometimes... sometimes... it's extremely rare, but you could have a lemon of a ski binding.
Related Articles:
How to: Adjust Marker Ski Bindings
How to: Adjust Salomon Ski Bindings
How to: Adjust Rossignol Ski Bindings
How to: Adjust Tyrolia Ski Bindings